
I get sooooooo many questions about my photography set up and workspace that I thought I’d prepare a post about my camera equipment and a bit about how I achieve my results. Perhaps this might be of some help to you now or in the future. This is NOT a “how to” exercise, but just my take on the process. A lot of what follows can get a bit technical, but I wanted to provide the most comprehensive information that I was capable of providing. However, it is opinionated, and I do not apologize for that, because it represents my own personal way of looking at macro photography.
Disclaimer: Let me emphasize that this is how I do it, not how you should do it. Let me say that again: This is how I perform my photography, not how you should perform your photography. There is no “right” way to take photographs — it is an art form like singing, playing a musical instrument, painting a picture, or growing a garden. The final results are what matter. Of course, there are some “better” ways to do tasks, resulting in time saving and efficiency. But, that’s not a call I wish to make here. Whatever works for you is the right way for you to do it. The idea is to experiment and practice, practice, practice so that you become as one with your equipment. I’ve been doing it for 30+ years, and I’m still learning.
We each see color (the Light) differently. In my case, have one eye that senses red slightly more than the other eye. I haven’t figured out if this is a positive or negative for me. It’s just what it is. Understanding how Light is captured in your camera is a good thing to know. It helps you set up the shot and allows you to make adjustments on your camera and with your lens and flash (if you choose to use one) to save time in processing the image and to get pleasing results.
My camera is not a point-and-shoot. I don’t want to come across as a camera snob, but to get polished results in challenging situations, a higher-end camera is sometimes required. With the iPhone and other smart phone devices becoming more and more sophisticated, the use of a complicated camera device will probably be obsolete by the time this blog post reaches you. So, again, this is just a “snapshot” in time of the way I shoot my images.
I also edit ALL of my images. <--"period". My post-processing software includes Adobe Bridge and PhotoShop CS6 - the last PhotoShop software that you can actually own and not have to rent from Adobe. It has all of the bells and whistles that I think I need to polish my images. I shoot in camera RAW mode exclusively. Wikipedia tells us that: "...a camera raw image file contains minimally processed data from the image sensor of either a digital camera, a motion picture film scanner, or other image scanner. Raw files are named so because they are not yet processed and therefore are not ready to be printed or edited with a bitmap graphics editor. Normally, the image is processed by a raw converter in a wide-gamut internal color space where precise adjustments can be made before conversion to a “positive” file format such as TIFF or JPEG for storage, printing, or further manipulation. There are dozens of raw formats in use by different manufacturers of digital image capture equipment.”
What this is actually saying is the image I download from my camera is the image/light that the camera sees without any (or only minimal) processing within the camera. There is no sharpening or color correction employed — just the raw image. These raw images will often look drab or dull straight out of the camera. Our eyes are a miracle of nature. Along with our brain, they perform a multitude of tasks to build an image within our head. Together, they automatically adjust for light sensitivity, color, white balance (will talk a bit about this later), depth perception (if both eyes are used), and a myriad other tasks that we just take for granted.
My current camera gear:
Sony α7rII Mirrorless Digital Camera:
full-frame 42.4-megapixel Exmor R back-illuminated structure CMOS sensor
BIONZ X Image Processor
Internal UHD 4K Video & S-Log2 Gamma
5-Axis SteadyShot INSIDE Stabilization
Sigma 105mm f/2.8 DG DN ART Macro Lens for Sony E-Mount (this is a lens with the prime focal length of 105mm)
Nikon 62mm NC Neutral Clear Filter (mainly to protect the front of the lens)
Manfrotto MT190CXPRO4 Carbon Fiber 4-Section Tripod with Horizontal Column, 63″ Max Height, Supports 15.4 lbs.
Manfrotto 327RC2 Light Duty Pistol-Grip Ball Head with Quick Release
Promaster 64GB Velocity Secure Digital (SDXC) Memory Card
Olympus FL-50R Electronic Flash (I use it hand-held)
Studiohut 4-Channel Wireless Remote FM Flash Speedlite Radio Trigger with 2.5mm PC Receiver for Flash Units with Universal Hot Shoe
Rather than post images of these items, I’ll suggest that you Google them if you care to see what they look like.
As you can see in the above list, there are a number of different product brands. Not all brands work well with other brands, but some do, and it may save you some cash if you can find some alternatives rather than sticking with the “same brand” theme. For instance, Sony does not currently make a 105mm macro lens (they do make a 90mm macro lens), so in order to get one, I had to switch brands. This 105mm lens is the same type I used to use for my previous Olympus E-5 camera setup and I really liked it, but this new lens has a different mounting ring that fits the Sony E-Mount setup.
I use a tripod about 99.99% of the time. Because I shoot at a slower shutter speed and low ISO, I need to prevent camera shake. I’m not always successful at doing this; the wind often plays an important part in the success of my image taking. That’s why I like to get out as early in the morning as possible before the sun sets up those pesky convection currents. However, getting out early is not often possible, especially when I have to travel 4 hours to a photography site. But, we do the best with what we have.
ISO, aperture, shutter speed, and white balance:
I just mentioned shutter speed and ISO, and there’s one more item that controls what you see in an image — aperture. These three things form an exposure triangle. Think of it this way: if you change one of these, you have to adjust at least one of the other two items to get similar lighting results.
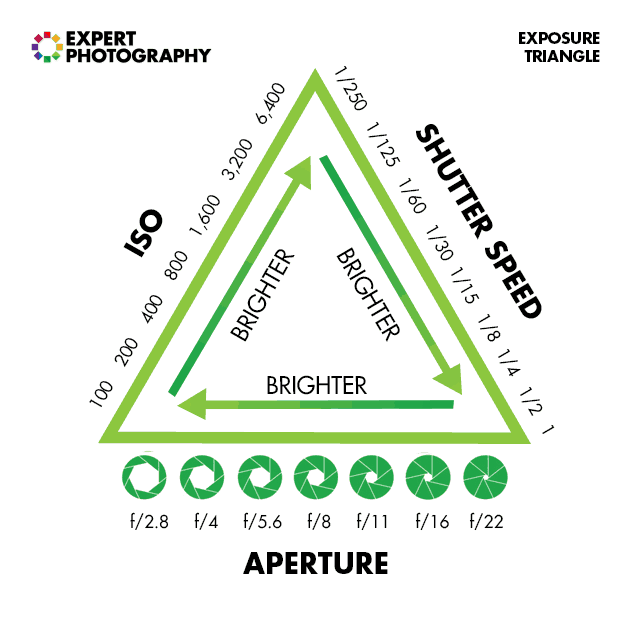
HERE is a good YouTube video explaining these values.
ISO:
Let’s look at ISO for a moment. In digital cameras, it controls the graininess or “noise” that might be present in an image. If you look at the dark portion of a particular image, sometimes you see granular specks which represent noise. Varying the ISO varies the capacity of camera to absorb light. In film photography, ISO was controlled by the size of the silver halide grains present in the film itself. The smaller the silver halide grains, the smaller the ISO number, and the less noise present in the image. I prefer to shoot at ISO 50 or sometimes ISO 100. This is fairly low, especially when there is low light, such as in deep woods. That is why I always use a tripod, because most cameras will not allow for clear hand-held shots in such low light conditions — even if a fill flash is employed.
Aperture and Shutter Speed:
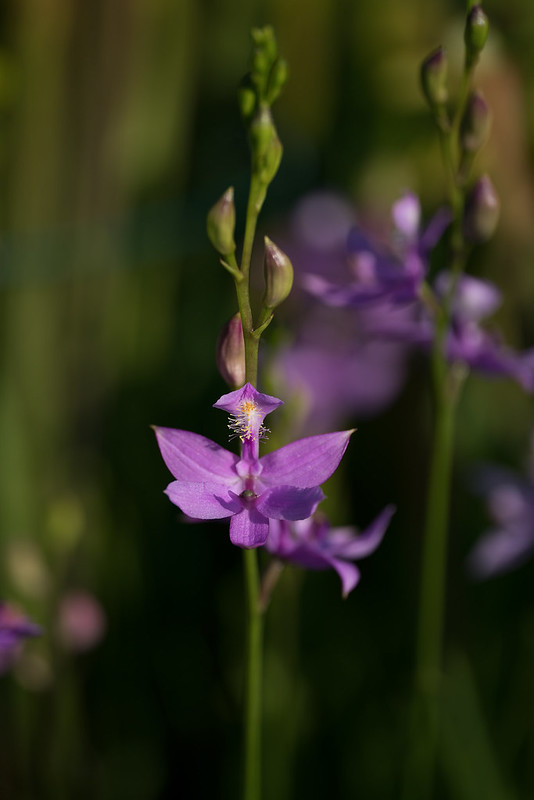
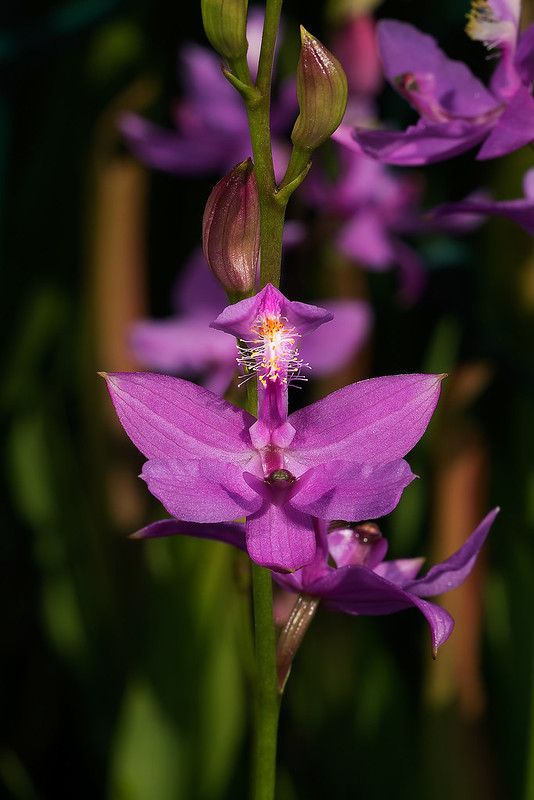
The aperture setting of the lens is a very important factor. The aperture setting controls the size/diameter of the hole that the light comes through when it enters the lens. It works the same way that the iris of your eye works. A low aperture number will result in a low depth-of-field of the subject with respect to the rest of the image. A high aperture number will result in a high depth-of-field of the subject with respect to the rest of the image. Depth-of-field (DOF) is the distance between the nearest and the farthest objects that are in acceptably sharp focus in an image. Here is an example of how changing the aperture changes the character/feel of an image:
 |
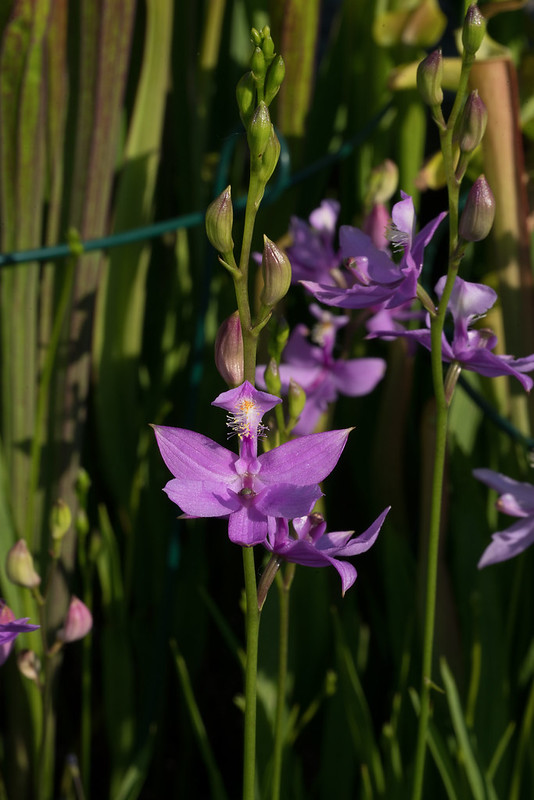 |
The image above left was taken with an aperture setting of f/3.2 while the image above right was taken with an aperture setting of f/22. Both of the above images are RAW images, straight out of the camera. BTW, these are Calopogon tuberosus or Common Grass-pink orchids currently growing in my bog garden.
Most of the time, depending on how I feel that day, I will choose an aperture setting in between — a happy medium, so to speak.
I shoot, almost exclusively, with a camera mode priority setting of “A” or Aperture. This will allow you to select/fix the aperture and the camera will automatically adjust the shutter speed. A faster shutter speed will let in less light; a slower shutter speed will let in more light. As I mentioned above, if one of the items in the exposure triangle changes, then another must be changed in order to get the same lighting results. Because I decide the ISO setting at the beginning of the shoot, the only settings I have to worry about are the shutter speed and the aperture. Even when the camera selects a particular shutter speed (remember, I’m on Aperture priority mode), I can still change it with a camera dial, keeping the aperture the same. Even in Aperture mode, I am still allowed to change the aperture using another camera dial. Since I use a mirrorless camera, I can see the intensity of light as well as the depth-of-field at any settings by viewing the image on the LCD on the back of the camera. This LCD screen on the back is called the “Live View”. I use Live View almost exclusively, because otherwise, I’d be prone on the ground most of the time trying to look through the viewfinder… Using Live View is a battery hog, but I carry around 4 spare camera batteries at full charge.
White Balance:
I’ll briefly mention white balance. The white balance setting on my camera is always on Automatic. However, because I shoot in RAW mode, it does not affect the image itself, only the way the image appears on the camera’s LCD. White balance is a measure of the temperature of the light. Incandescent light is warm. Fluorescent light is green. Yep, that’s why some images taken under fluorescent light come out looking weird. Any actual lighting temperature measure in the environment that is lower than the white balance setting on your camera will yield a more blue or “cooler” image. That’s why images taken in the dark woods often look bluish if the white balance is set for daylight.
Fill flash:
I’m often asked about using flash on my wildflower subjects. Most of the time, I do, but I try to make it as unobtrusive as possible. My main goal in using flash is to fill in the shadows (especially the harsh shadows cast by bright sunlight) to make a more “pleasing” image, or to create mild shadow if the subject is in the deep woods, for example. Well, “pleasing” — that’s subjective as all get-out, isn’t it!?! I do like some shadows; they help define the subject more clearly. I employ an old Olympus flash which I use in a hand-held fashion at an angle to the subject. In my way of seeing a subject, having a flash directly attached to the hot shoe of the camera seems to obliterate any slight, defining shadows that add depth to the subject. It tends to “flatten” the image. I use an inexpensive FM radio-controlled shutter release device, one piece of which is attached to the camera’s hot shoe, and the other is attached to the base of the flash attachment. When the shutter release is pressed, a simultaneous signal is sent to activate the flash. Works like a charm, and there’s no annoying cable to contend with. Incidentally, I use the built-in, 2-second, shutter release time delay on my camera to allow me time to position the hand-held flash after I press the shutter button on the camera. The fill flash unit has a translucent, white, snap-on diffuser to spread and dull the light somewhat. This is important, because of the short distance between the fill flash and the subject.
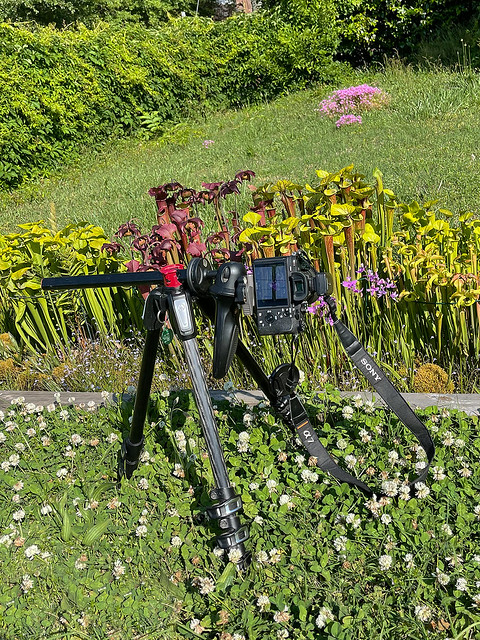
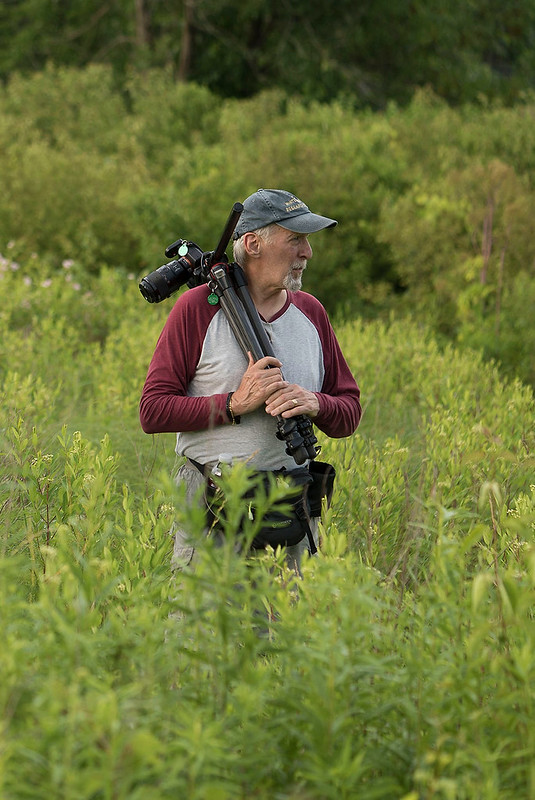
Tripod:
As previously mentioned, the tripod I use is a heavy-duty one from Manfrotto. It has served me well, as I have had to replace only the rubber foot on one of the legs. I like this tripod because it has a horizontal column feature that allows the tripod to be lowered to ground level without having the post hinder its lowering. Of course, the post can be used in a vertical position as well for landscape shots, but I do most of my work on the ground, so having the ability to have a horizontal column is important. Here are a couple of iPhone shots of the setup I used in front of my bog garden today:
 |
 |
Please ignore the scruffy lawn. Also, notice that I use a lens cap with a cord attached to the lens. I cannot tell you the number of lens caps I lost over the years when I didn’t use this type of lens cap. It’s so handy — just click it off and let it fall in place. When you’re done, just reach down and click it back on. No more lost lens caps!
Connecting the camera to my tripod is a Pistol-Grip ball head. Many people do not like this apparatus. In fact, either you like it or you hate it. For me, the ease of being able to adjust the position/rotation of the camera with a single fluid motion rather than adjusting an array of knobs is a huge plus. It is not even necessary to look at the apparatus in order to adjust it. I understand how it might seem to strain the grip of the hand, but after using it for a couple of years, it is not a problem for me. The tension is adjustable, though. Just my personal preference.
Image Post-processing:
Now, just a very little bit about the image post-processing I perform on all of my images. As mentioned above, I use Adobe Bridge to download the images from my camera to my laptop. I do some initial sharpening and color correction from within Adobe Bridge, and then I send the image over to PhotoShop CS6 for detail processing and saving. These tools are indispensable for my use. There are some of you out there (you know who you are) who are purists and do not wish to do any post-processing at all — just straight out of the camera. That’s great! More power to you! It is my preference to process my images, especially because I shoot in RAW mode, so that I can get the best representation of what I saw in the field. It also allows me to correct certain screw-ups such as bad camera angle or to enlarge the heck out of a portion of the image. I can do that on a well-focused image because my camera produces a 42.4-megapixel RAW image. The following is an example of where I straightened up a skewed image and enlarged a portion of it to please my own sensibilities:
 |
 |
Raw, unprocessed example of skewed image above left and processed, enlarged image above right.
Miscellaneous stuff:
I think I need to address another subject that I’m often asked about. This is about using a dark/black background in the field. I have used a black background for images I’ve made inside, at home. I did this just to test out how I felt about them. They are fine. Many professional photographers, especially those who take images of orchids at judging events, for example, employ this technique. It is easy to see how this technique removes any distracting stuff and allows the subject to be center stage. Perfect! But, in the field, it is my preference to allow the supporting cast of associated vegetation/sticks/leaves to have a role in the image, as well. Of course, the subject or star of the show will be highlighted by fill flash whenever possible. My feeling is that it looks just a bit artificial for my tastes to obscure the background in such instances. ‘Nuf said…
I cannot think of any more to add to this right now, so I’ll end this post here.
It is my hope that this has answered most of your questions about how I do my photography work. Maybe it has even spurred you on to learn more about how to capture the Light on your camera and how some of the controls on your camera actually function. Each of our cameras will be different, but the controls will probably function in a similar manner.
As I indicated earlier, I’ve been at this for quite a long time and am still learning. That’s what makes it fun for me. That, and sharing my adventures in the field with you. Please feel free to disagree with anything I’ve said or to add something in the comments that I may have forgotten.
Until next time…
–Jim
11 Responses
Useful info.Well done!
A wonderfully thought out and written, how I do it photography post Jim!!!
It is possible to get a dark background in the camera by going to -3 on the exposure compensation and putting the background in shade and the flower object in sun. The shade can be from a person’s shadow or any other screen you may have, from a jacket hung on sticks to a dark reflector at right angles to the incoming light.
Thank you. I appreciate you and your work and contributions. Please visit Manitou Cave of ALabama.
Very much appreciated, I always hesitated to ask these questions knowing it would be a lot of work on your side but you were up for the task.
Well done Jim!
As a fellow photographer with similar equipment, I find it both exciting and alarming that iPhones can, as you mention, take good photos, but the phone still doesn’t give precise control over exposure and depth of field that you achieve with your camera, so the higher-end digital cameras are going to be with us for a while.
Also if you were shopping for equipment today, you would probably end up with a later version of the camera, and maybe a flash made for the Sony system, because technology is a moving target.
Thank you for this detailed explanation of how you perform your magic. I follow you around a lot and am still learning from you.
Jim:
Thank you so very much for your excellent post on how you use your camera. It is exactly what so many of us “wannabe” photographers out here need. Really appreciate you sharing all your valuable information and your experience photographing wildflowers! You are the greatest my friend!
Love this post! A wonderful explanation of how you do such wonderful photos.
Great post Jim! You gave us a glimpse over your photographer shoulder and distilled down to the basics to help guide photographers in developing their own process. I learned photography with an all manual match-needle Olympus OM-1 back in the 70’s. Learning on an all manual camera was wonderful as it built my foundation for understanding how aperture/shutter speed/ISO work together to focus the subject and paint the light on the film (K64 then, processor today). John Shaw was my photographer hero in those days and I even managed to take a workshop under him at Grandfather Mountain with Hugh Morton. I now mostly take “reference” photos with a smartphone or modest mirrorless camera but still use the basics I learned many years ago. I have been a big fan of your photography since I found your work in more recent years. Your photographs are wonderful and your knowledge of the plants is impressive. Thank you so much for sharing both so freely with us!
Thanks so much for your thoughtful description of your gear and how you use it. I always enjoy viewing the images in your blogs.
Thank you Jim for the description of your equipment and the different settings you use on your camera.
Do you feel if the focusing method used has much of a bearing? My camera has multi, center and spot focusing settings. Do you play with this feature or keep it consistent for your images?